

Gain staging is setting a healthy signal level at each step of your recording chain, from the microphone to the preamp to the file on your computer, so nothing is too quiet or too loud. For home vocals, it mostly comes down to one knob: the input gain on your audio interface. Set it so your loudest singing peaks around -10 dBFS on the meter, well below the top, and your takes will be neither quiet nor clipped.
This article is about tracking levels, the part you have to get right before you press record. Balancing levels during mixing is a separate job, covered in our guide to the 8 steps to mix music. Get the recording level right first and mixing becomes much easier.
What is gain staging?
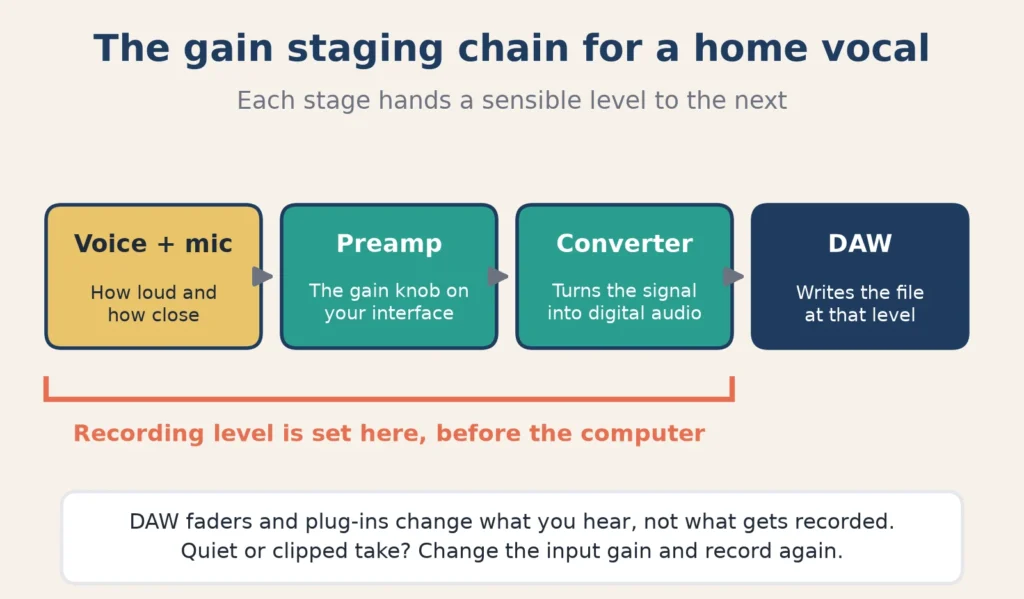
Every recording passes through a chain of “stages.” For a typical home vocal, that chain is:
- Your voice and the microphone. How loud you sing and how close you are to the mic.
- The preamp. The gain knob on your interface boosts the mic’s tiny signal to a usable level.
- The converter. The interface turns that signal into digital audio.
- Your DAW. The audio is written to a file at that level.
Gain staging means each stage hands a sensible level to the next. If the preamp gain is too low, the file is quiet and you end up boosting noise later. If it is too high, the signal hits the ceiling of the converter and clips, and that distortion is recorded permanently.
The key idea for home recording: the level that matters is set before the signal reaches your computer. Moving faders in your DAW changes what you hear, not what gets recorded.
Why is my vocal recording so quiet?
A quiet take almost always means the input gain on your interface is too low. Other common causes:
- You are too far from the mic. Every doubling of distance drops the level noticeably. Most vocals sound good a hand’s width or so from the mic, with a pop filter between.
- You are singing into the side or back of the mic. Many mics only pick up well from the front.
- The wrong input is selected. Your DAW might be recording from the computer’s built-in mic or the wrong interface channel.
- A pad switch is on. Some interfaces and mics have a pad (-10 or -20 dB) for loud sources. Turn it off for normal vocals.
- You are reading the monitoring level, not the recording level. A track can sound quiet in your headphones because its fader is down, even though the file is fine.
A slightly quiet recording at 24-bit is not a disaster. You can raise it later with little added noise. A very quiet one forces you to turn up the room noise and hiss along with your voice.
Why are my vocals clipping?
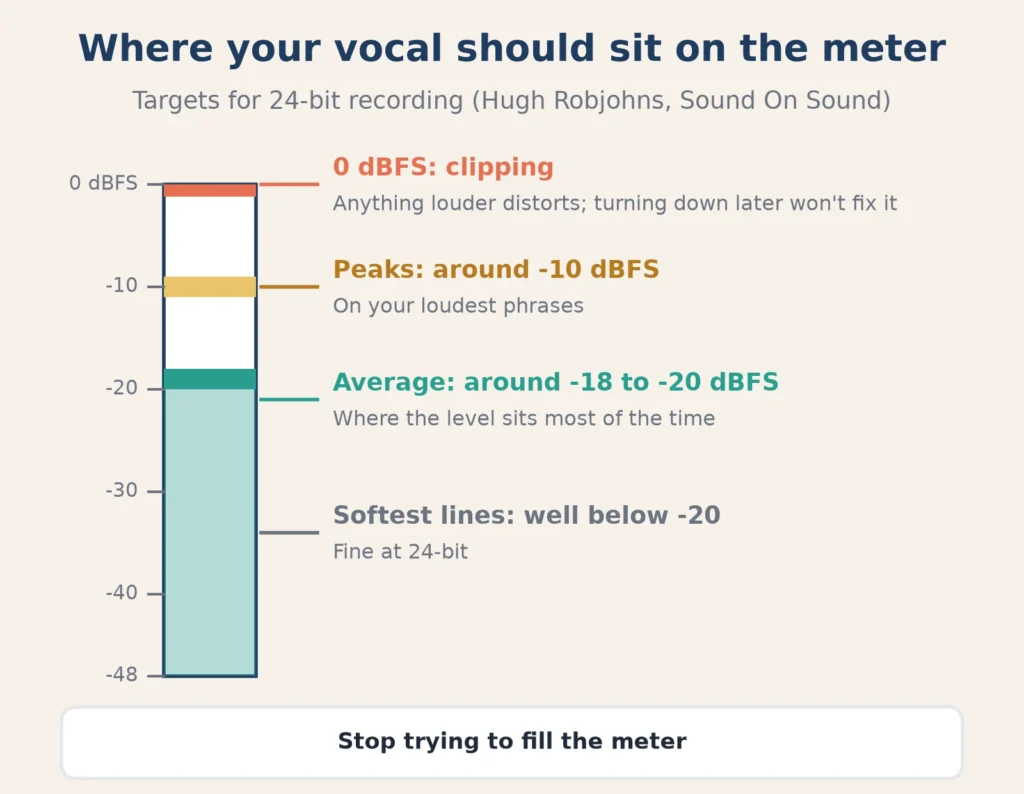
Clipping happens when the signal tries to go above the maximum level a digital system can represent: 0 dBFS (decibels relative to full scale). Anything above that is cut off flat, and you hear a harsh crackle or distortion on the loudest words.
Common causes:
- The input gain is set for your quiet verse, and the chorus is much louder. This is the most common cause by far.
- You moved closer to the mic during an intense line.
- You set gain while talking or humming instead of singing at full performance level.
- A loud consonant or laugh spiked the level.
Clipping on the way in cannot be fixed by turning the track down afterward. Lowering the fader just makes the distortion quieter. Our article on 4 major problems with home-recorded vocals covers how clipping sounds and what to do with a take that already has it. The goal here is to prevent it.
What level should you record vocals at?
For 24-bit recording, aim for:
- Peaks around -10 dBFS on your loudest phrases.
- An average level around -18 to -20 dBFS most of the time.
That guidance comes from Sound On Sound technical editor Hugh Robjohns, who explains in How much headroom should I leave with 24-bit recording? that -18 dBFS is the digital equivalent of the old 0 VU mark on analog gear, with peaks “typically kicking up to around -10dBFS or so.” He adds that recording hotter “won’t improve the actual noise performance at all” for a mic in a normal room, because the room and the electronics are noisier than a 24-bit recording system.
This is why 24-bit matters. Apple’s Logic Pro guide notes that 24-bit has a dynamic range of 144 dB, far more than any vocal needs, so leaving plenty of headroom costs you nothing. If you have not set your bit depth yet, our guide to the sample rate for recording vocals covers it.
In short: stop trying to fill the meter. A meter that barely reaches halfway on the loudest note is closer to right than one touching the top.
How do you gain stage vocals when you track?
Here is the process, start to finish. It takes about two minutes.
1. Set up your position first
Put the mic and pop filter where you will actually sing, at your normal distance. Stand or sit the way you will perform. Gain set at one distance is wrong at another.
2. Turn the input gain all the way down
Start from zero on the interface’s gain knob for your mic channel. If you use a condenser mic, turn on phantom power (48V) first, then raise the gain. If your interface has a pad switch, leave it off.
3. Sing the loudest part of the song
Do not talk, count or hum. Sing the loudest, most intense line in the song at full performance level, usually the final chorus or the highest note. That is the moment most likely to clip, so set your level for it.
4. Raise the gain until peaks reach about -10 dBFS
Watch your DAW’s input meter while you sing that loud line. Turn the gain up slowly until the peaks land around -10 dBFS. Most interfaces also have a signal or clip light. A green signal light is good. A red light means back off.
5. Leave headroom for surprises
Real takes get louder than sound checks. Once you are excited, you will push harder. If you are unsure, err a little low. A take peaking at -14 is perfectly usable. A take that clipped once in the best chorus of your life is a problem.
6. Check a quiet line
Now sing the softest part. It will sit well below -20 on the meter, which is fine at 24-bit. If it is so quiet the meter barely moves, move a little closer for that section rather than raising the gain for the whole song.
7. Do not touch the gain mid-song
Changing gain in the middle of a take makes the level jump. If a song has a whisper verse and a shouted chorus, record the sections separately with different gain settings, or simply let the verse be quiet.
8. Record a test take and listen
Record ten seconds of the loudest part, play it back, and look at the waveform. It should be clearly visible but nowhere near the edges of the region. Listen for distortion on the loudest words.
How do you gain stage in Logic Pro?
Logic follows the same rule as every DAW: the recording level is set on your interface, not in Logic. Apple’s Before recording audio page puts it plainly. The monitoring level “controls the playback (or monitoring) level, not the recording level.”
That means:
- The channel strip fader does not change what is recorded. If a take is quiet or clipping, moving the fader will not help. Change the input gain on your interface.
- Watch the meter on the record-enabled track’s channel strip while you sing. With the track record-enabled and input monitoring on, the meter shows the incoming level.
- Watch for the clip indicator. If a peak goes over, the channel strip’s peak display turns red. Click it to reset, lower the interface gain, and re-record.
- Check the input setting. In the track’s channel strip, make sure the input matches the interface input your mic is plugged into.
- Plug-ins on the track do not change the raw recording. Effects you hear while monitoring are not printed to the file. They only change what you hear.
If your interface has its own control software, it may have a digital gain or level control too. Use one place to set gain, usually the physical knob, and leave the rest at their default so you are not fighting two controls.
For how your interface fits into this chain, see our guide on audio interface benefits.
Gain staging myths that cause bad takes
A lot of confusion about recording levels comes from advice that made sense in a different era.
“Record as hot as possible.” This was useful with 16-bit systems and analog tape, where low levels meant audible noise. At 24-bit, the converter’s noise floor is far below the noise of any room. Recording hot just shrinks your safety margin.
“Turn up the fader if it is too quiet.” The fader changes what you hear. If the file is quiet, only the input gain fixes it on the next take.
“A limiter or compressor on the track will stop clipping.” A plug-in in your DAW sits after the converter. If the signal clipped on the way in, the plug-in is processing an already-distorted recording. Some interfaces have hardware limiting before the converter, but that is a feature of the interface, not of a plug-in.
“Normalizing will fix a quiet take.” Normalizing raises the whole file, including the noise. It is fine for a take that is slightly low, but it does not undo a badly set level.
“Gain staging is a mixing thing.” Mixing has its own version, but tracking is where it starts. A clean, well-leveled recording is the best gift you can give your future mix.
Gain staging when you record yourself
When you are both singer and engineer, a few habits help:
- Set gain, then forget the meter. Glancing at the screen mid-take breaks your performance. Set the level carefully once, then sing.
- Re-check gain for each new section if the dynamics change a lot.
- Re-check when you change mics or positions. A new song or a new microphone means a new level.
- Write your settings down. If you get a great level, note the knob position so you can match it for overdubs or a later session.
Our list of 10 mistakes not to make while recording vocals includes recording at the wrong level as one of the most common errors. This step-by-step routine is the fix. For more on the rest of a home vocal session, see our 13 tips for recording better vocals at home.
FAQ
How is gain staging done?
Set your input gain on the interface while singing the loudest part of the song, aiming for peaks around -10 dBFS, then leave it there. That one step covers most home vocal gain staging.
How do you gain stage vocals?
Position the mic, start with the gain at zero, sing your loudest line, and raise the gain until peaks reach about -10 dBFS. Check a test take for distortion before the real session.
How do you do gain staging in Logic?
Set the level on your audio interface and watch the input meter on the record-enabled channel strip. Logic’s fader controls monitoring volume, not the recording level.
What level should I gain stage to?
For 24-bit tracking, peaks around -10 dBFS with an average near -18 dBFS is a widely used target.
Is it bad if my vocal recording is too quiet?
A little quiet is fine at 24-bit. Very quiet recordings bring up noise when you boost them, so aim for the target range.