Home studio built, Gear acquired, Acoustics tamed, DAW mastered, Signals flowing, Editing magic at your fingertips, all you need now are master the steps for mixing music steps. So here we are it’s time to overcome one more giant hurdle, But before we do, lets answer an important question…
HOW DO YOU GET GOOD AT MIXING?
Reaching proficiency with the mixing process of music production requires critical listening, honed skills, and an efficient workflow. This can be achieved through the deliberate effort of routine experimentation, reflection and refinement of technique.
For more on music production tips: read this!
The good thing in all of that is, it can be done and you can do it! Of that I am certain.
Like anything else, you can’t get good if you don’t get started. So instead of feeling overwhelmed let’s sort it out and make sense of it one step at a time.
To be clear this is a beginners guide. This is not intended for anyone with advance skills mixing. It is an introduction to help familiarize someone who is just getting started. The primary focus will be an entry-level up-to-speed with new terminology and concepts.
A Word To The Wise
If you are just starting, you want to be careful charging for inferior work. You don’t want to burn your credibility at go. So cool your jets and work on what you need to before you open the door to paying customers.
The Steps To Mixing Music
We’ll start with an introduction to some of the most common steps in the mixing process.
The steps to mix music include:
- Step 1. Preparation
- Step 2. Balancing Levels and Panning
- Step 3. EQ
- Step 4. Compression
- Step 5. Spatial Depth and Ambiance
- Step 6. Automation
- Step 7. Effects and Revisions
- Step 8. Mix Down
While every mix engineer has their own unique workflow nuances, core principles and techniques that form the foundation of their approach to each mix. It’s all about learning and developing good habits. Then consistently applying them to become a professional.
These core principles should be seen as a flexible framework to guide you through the steps of mixing music journey, not a rigid set of rules.
As you gain experience and hone your skills, you’ll learn to adapt and refine each to suit the specific needs of the song you are working on.
Step 1. Preparation
The first job before getting down to the completing the steps for mixing music is preparation. It is very important to manage the transition from the editing process to the mix down well. Going into the mix process without having dealt with tracking problems is counterintuitive.
The saying goes… leave nothing for tomorrow that can be done today and that certainly applies to this. Thorough preparation is a critical step to being efficient. So in order to be efficient leave nothing to fix in the mix.
The truth be told the more organized you are with managing your sessions the smoother they will go. Don’t make unnecessary annoyances for yourself to be disturbed by. In fact make it a habitual practice to avoid doing so.
Well Edited Tracks
Regardless to whether you’ve tracked the vocals yourself or you are just the mix engineer, They’re your responsibility now. Be sure that before the mix begins all of the tracks have been edited well.
Most DAWs feature a “Strip Silence,” tool to swiftly cut silent gaps between vocal or instrumental segments, preventing unwanted room noise amplification during compression and ensuring a clean mix.
In addition to Stripping Silence you will all also want to apply fade-ins and fade-outs to all those newly cut audio segments or regions.
Punch-Ins
Punch-ins allow you to record on top of an existing track. This is a common feature if the vocalist sang every thing well with the exception of one or two words. Rather than throw out the whole take we can designate punch in and out points before and after the mistake.
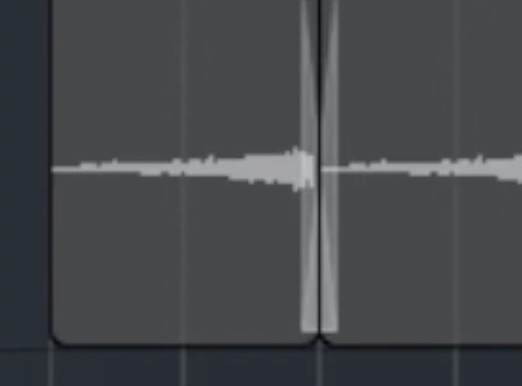
When the timeline reaches the punch in point it will begin to record. As soon as it reaches the punch out point it will stop recording. Now you will have a region that has been spliced into the original file. You will need to apply a crossfade to any two regions you are splicing together.

A crossfade will help to prevent any undesirable popping that can result from the abrupt transition from one segment to the next.
You may also have to play with the trim tool a bit before you do so to be sure that the vocal phrasing hasn’t been cut mid word or conjoined together mid-word with the next consecutive audio region.
If you are preparing to mix and play back the session for the first time and you hear strange popping noises and overly compressed room noise the edit features I mentioned may be the best first places to look.
Organization
Organize your tracks Inside of the DAW session in some orderly way. For instance you could start by listing all of your drum tracks and grouping them together one after the next.
Once they are in an order designate each of the drum tracks with one uniform track color unique to drums. Now when you look at you monitor you can clearly identify and differentiate your drums.
After your drum tracks you could list the bass track and give it a track color designation of its own. From there you could group together all of guitar tracks. Then all of the synth tracks.
And lastly all of the vocal tracks. Choose a unique track color designation for each grouping o tracks. This will make verything will be easy to identify and differentiate. Here is a link to article with great tips for producing good vocals specifically about doubling tracks… Enjoy it!
This greatly enhances session organization for your upcoming mix. Establish a consistent workflow to avoid guessing track locations and speed up your work.
Preparation
Preparation ensures a familiar starting point, saving time and avoiding headaches.
In order for any mix to sound well you have to start by bringing up the levels. You’ll first need to check your recorded volumes. To do that, bring each of your faders to nominal gain. There should be no embellishments Such as EQ, Panning or Compression made at this time.
Confirm that all of the raised levels are up as high as they can be without clipping. It is important to leave headroom for the mastering phase though. So be especially careful. Confirm to yourself that you are able to hear all of the tracks that you have recorded.
Apply gain staging to any tracks that require a boost to bring up their level and apply reduction in gain if the tracks were recorded to hot and are in danger of clipping.
Once this is done you will be able to start panning and balancing levels. Only after all of that has been sorted should you think about going on to add any panning EQing or compression.
STEP 2. Balancing Levels and Panning

This is the moment you have been waiting for, lets hope you enjoy yourself. In this stage you will spend some time playing back the song over and over. With each pass through you will begin balancing the faders in ways that seem appropriate for the song.
You will also begin to adjust panning for the tracks. While doing so listen to measure how your choices are balancing the song. During the course of moving through the song multiple times you will eventually work across all of the tracks.
It is also likely that you’ll need to make secondary adjustments. This is normal. The process of balancing levels is fluid.
Consider This:
After finishing your first task you move onto the second. The problem is the adjustments you make on the second task throw the work you just finished on the first one out of whack.
Now you’re forced to go back and refine your earlier step. You can expect that this process will take a little bit of back and forth with your adjustments.
Each adjustment leaves another imbalance. It’s tempting to keep spinning in circles. But you can’t. You will have to do your best to find the middle ground.
Make necessary adjustments, compromise when needed, and systematically follow your ears across the song to achieve a balanced mix.
By moving your way over the song like this you’ll begin to make progress.
In different sections of the song, a track’s performance dynamics may audibly peak. Before automation, determine the optimal median level for each track.
When you have your levels and panning balanced double check that you are not clipping your Master. Be sure that you have allowed for headroom
STEP 3. EQ
The EQing process is one of the most important steps mixing music well. So be patient. It will take some time to familiarize yourself with each specific instrument and It’s respective frequency range.
Taking the time to do this is very important. There are a lot of those instruments that share frequencies. When you go to mix everything down to a stereo two track those shared frequencies wash together. This is called masking. When those frequencies mask they become difficult to differentiate.
Subtle Adjustments
A mix engineer will make subtle adjustments to the EQing of the instruments. This serves to make more of a distinction to where one begins and another ends. It is in order to make each instrument stand out in the mix.

The engineer will have a high pass filter HPF and a low pass filter LPF, at their disposal. These allow the ability to remove all of the Low frequencies beneath a designated point or all of the High Frequencies above a designated point.
If you are going to have bass guitars and drums in the song, then allowing all of the bass from an acoustic guitar to remain may be a bit of a redundancy.
That redundancy will lead to masking. Then your mix may not sound clear or interesting. Rolling off some of the guitars low end will give the bass and drums more breathing room. It will separate your guitar just enough to make a gratifying distinction.
Additive and Subtractive EQing
In addition to the HPF and LPF tools, a mix engineer can also use Additive and Subtractive EQing. When you open up your DAW and bring up your EQ it will have a certain number of bands. These bands are like insertion points used to designate a specific frequency and make adjustments specifically to it.
Perhaps my guitar track is open and I’m trying to sculpt it ever so slightly. If I wanted to use subtractive EQing what I would do is sweep across all the frequencies looking for something that sounds bad. When I find it I slightly bring the volume level of that particular frequency down.
I can identify an unwanted frequency like this by selecting a band and temporarily turning the bands volume up to a high level. Then I can begin to sweep across the frequency range. When you do this please note that nothing will sound good or natural so don’t be surprised that it doesn’t.
That isn’t what we are worried about. We are looking for the one certain frequency that has some audible characteristic that is significantly more unpleasant or strange. That is the frequency you’ll want to attenuate.
Q
The next parameter to manipulate is called the Q. The Q defines how wide or broad and encompassing the area is surrounding the targeted frequency. With the Q you can define this to be wide or narrow. If you are doing some subtractive EQing you could probably keep the Q setting a little more on the narrow side and conversely wider on additive EQing.
Strive to make minor adjustments to the EQing of your instruments and vocals to make them sound as clear and natural as possible.
Every instrument has it’s own frequency range, and that includes every vocalist. While you will become familiar with those frequency ranges you will still have to search out problematic frequency areas on a case by case basis.
Step 4. Compression
Another one of the important steps for mixing music its compression. We can use compression to control the dynamics. A compressor is a tool to make soft sounds louder and loud sounds soft. It levels everything. This shouldn’t be used randomly or on everything but rather in specific instances. It should be used to help you fix problems you may be having with keeping your tracks from running away in your mix.
If you are struggling with getting the volume level just right in one section of the song for one particular track only to find that in the subsequent section that instrument is yet again too loud, then this would be a job for your compressor. You can go into the plugin and set it up to compress at a ratio that levels and controls its dynamics.
Once you have this situated the way you want. You can go back to adjusting the volume level. From there you will find that the track will not be so unruly to work with. Using a compressor especially for Vocals Kick and Bass is common, as these three items need to be consistent throughout the duration of the song. In addition to being used as a leveler the compressor can also be used as an effect in order to shape tones and make parts that are dull seem more aggressive.
Step 5. Spatial Depth and Ambiance

While panning will give your mix spatial spread left and right, reverb can be added to give the mix spatial depth. A reverb is an approximation of the sonic characteristics of any certain sized room. Using reverb to create spatial dept is as easy as deciding what position you wish the various instruments to exist with in that spatial depth. The further into the distance that you wish those elements to be perceived the more you should send them to your reverb. While conversely the nearer to the forefront you wish the element to be perceived the less they should be sent to the reverb. In addition to using the reverb to create depth, a delay can also be applied to create space on a track.
Step 6. Automation
Volume automation lets you automate volume levels throughout the song. Topically speaking it can be used to address outstanding leveling issues between sections of the song. In terms of making the song more energetic and interesting automation can be used to fill in vocal performance gaps between phrasings with background instrumentation fills. Automation can also be used to accentuate something intentionally and Automation is commonly used to ramp up levels into choruses to create intensity. Get creative and work your way through the song. Be careful not to over do it. Even the slightest increases to volume may be too much so double check your work and be sure that what you did was warranted.
Step 7. Effects and Revisions
In this step we can use some of our plugins and effects artistically and dramatically. You certainly won’t want to drown your mix in them. But, by strategically adding a few interesting elements you’ll likely bring an excitement or unexpected surprise to the mix that otherwise may not have been realized. This is your chance to open them up, see what they can do and find out what you can do with them. Again, keep it in moderation and you should be ok.
This would also be the time to assess if there are any things to be added or subtracted. You may want to automate an effect or add in an additional drum sample or keyboard element. Otherwise if everything is how you would have it then it is time to prepare to mix down.
Step 8. Mix Down
During the final pass make sure that you keep an eye on your meters. Be sure that you are not coming in too hot. You’ll want to make sure that you’ve left plenty of headroom for the Mastering Engineer to have ample room to do good work. You should strive to keep peaks below -1db. In addition it is best to refrain by using any master limiter or master compressor during the final mix.
Now you have one done, but how many do you need to finish the album??? Here is how many!
In Conclusion
Advancing your capacities with mixing requires time and experience. You also need to continue practicing the steps to mixing music. This article was intended to initiate and provide some insight into terms and concepts related to the steps of mixing music. It will be your responsibility to begin your own exploration of the processes we’ve discussed at home in your own project studio working inside of your own DAW and using your own music as a guinea pig. More advanced procedures can be easily searched for and consumed on a need to know basis, that means to say, you should make efforts to know what you need to know as you need to know it. When you reach the point that it becomes necessary to understand some certain intricacy, search it out.
After your music is all finished, and you need to release it or to advise a client on how they should, this guide will help: Bookmark and Save it!
The steps for Mixing music is a methodicalprocess, Do your best and with time you’ll be pleased with the results. When I was in school they had us all read this book… I still keep one handy, here is the link: It’s called “the mix engineer’s handbook“ written by Bobby Owsinki. its a good reference to have handy.
Now go and get to it!
Good luck.
