
I realize that for so many of us finally getting up the courage to level up our project studio with customized fiberglass acoustic panels is a big deal. For the most part we are contented just having a place to work on our passion without being interrupted by others coming and going. It is nice to have a place to go to in order to detach and work on some music. For the most part we couldn’t care less about any frilly accruements.
But sometimes contentment wanes and we start to visualize what our space could look like if only we put a little bit of time into it. We scan the Internet, read blogs or maybe even flick through Pinterest to look at the things others have done. I can only speak for myself but after sessions like this I start feeling a little bit bad. When I see all of this greatness I inadvertently start to feel a little bit insecure. It may even be a little tinge of jealousy and resentment. But in the end what good does that bring?
Change
After years and years of flicking through photographs of project studios online I decided it was time to dig deep and give myself a little pampering. But in order to save money and get my studio dressed properly I would have to ideate a couple of fun ideas and fortunately I did. Hopefully my tenacity gives you some ambition and gusto to do something unique and challenging to breath some life into your workspace as well.
So at university I had a Teacher who had worked as a Disney Imagineer. The gist I got was these Imagineers huddle around together in some cushy office somewhere at the park drinking lattes and daydreaming about how they can make the park experience more fantastic. The applicable takeaway I left his class with was the notion about ideation and the practice of combining unrelated things until the have formed something new. It isn’t a new idea I know but, I had to read a book for the class and I was forced to focus. So the idea finally stuck with me.
Customized Fiberglass Acoustic Panels
Twenty years later and I’m looking online at DIY rigid fiberglass panels. Everyone making their own will cut some wood frame 2 feet by 4 feet. The panels are the exact dimensions that the fiberglass comes packaged in. Panel builders will then tack some support bracket to the back, wrap the whole thing in fabric and finally proceed to make a how-to video about their creation to post on the internet. Now, I know I’m leaning a little hard but it’s really just for affect. I’m not making fun of these people. In fact it was they who informed me that making your panels could be done and for that I am grateful. I just wanted to take it a step farther.
So I was starring at their panels and thinking about the difference between an expensive studio design and this DIY effort. Quite frankly the DIYers are building something fast useful and efficient. Which is applaudable and perfectly fine for function. But function does nothing to inspire, there is no ambiance or excitement.
I thought long and hard about this and I was left with one question… Why? Now I know trapping sound is science and science requires precision. But why couldn’t you build some pieces in a very standard boring way and then create some others that are a bit more of a statement. These statement pieces will still have function and will be functional but in addition to that they do more to convey a sense of confidence and self value that can be perceived and valued by your costumers.
Ideation
So in keeping with the lesson I learned all those years ago, I started dumping unrelated geometric images into my mind. Some of the things I would look at were so fantastic. I’m happy to have looked at the geometric things and the architectural works with geometry. The problem I realized was scale. I am not an architect and I have a very limited budget. While I am competent for a challenge, I admittedly have a limited arsenal of tools. I did a lot of searches about “geometric cardboard dividing walls” some of that stuff was fantastic. I didn’t use any of the ideas but I think they are very usable especially with some polyester and felt. From that cardboard geometry the thing that did start to connect with me were triangles. So I searched Triangle wall Art. That search yielded a few photos of people painting geometric triangle patterns on their walls. What they would do was use painters tape to tape-out or “draw” their geometric design on the wall. Then they would select a few shades of paint and paint each triangle a different shade so that no two shades touched.
This was the seed that gestated. Somehow I realized that instead of using the painter’s tape I could use the wood framing to “draw” out the geometric triangles. The idea began to refine.
Being that the fiberglass panels are 5 centimeters thick. I knew I could go to the hardware store and have plywood ripped into about twenty-three pieces. Each one being five centimeters wide. It would be cheap and easy to work with. It was the perfect solution for my Customized Fiberglass Acoustic Panels.
Design
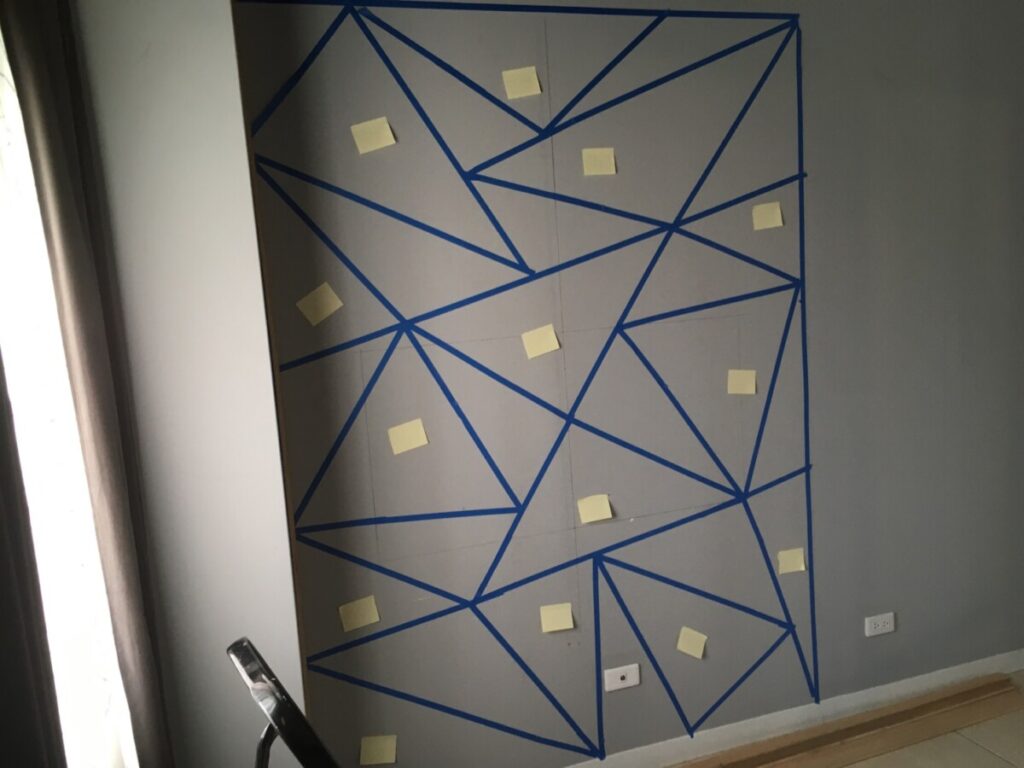
So how would I design the geometrical grid work? This was a little bit tricky and I can’t remember exactly how much time had passed before I solved the riddle. But I finally did. I decided to use the painter’s technique. First, I chose a portion on the wall by height and width to represent my frame. Then, I used painter’s tape to outline the square. I taped out the outline in the exact position where I would later install the panel. It was best for me to sketch the idea in that place so I could determine whether it was satisfactory before ever picking up a saw. It could however be designed off site and installed later.
My Idea was to follow the technique that the bloggers demonstrated for taping out the geometric triangles and I did that. Then I took a step back soaked it in and made refinements. I always work slowly and I do so to let things sink in so that I can find a sense of confidence with the decision. Once I’ve decided I don’t look back. And the same holds true for my triangles. Eventually I had the whole work traced out with tape, and refined. Then I spent a little bit of time thinking long and hard about how exactly this was going to work and what I needed to do next.
Building Frame
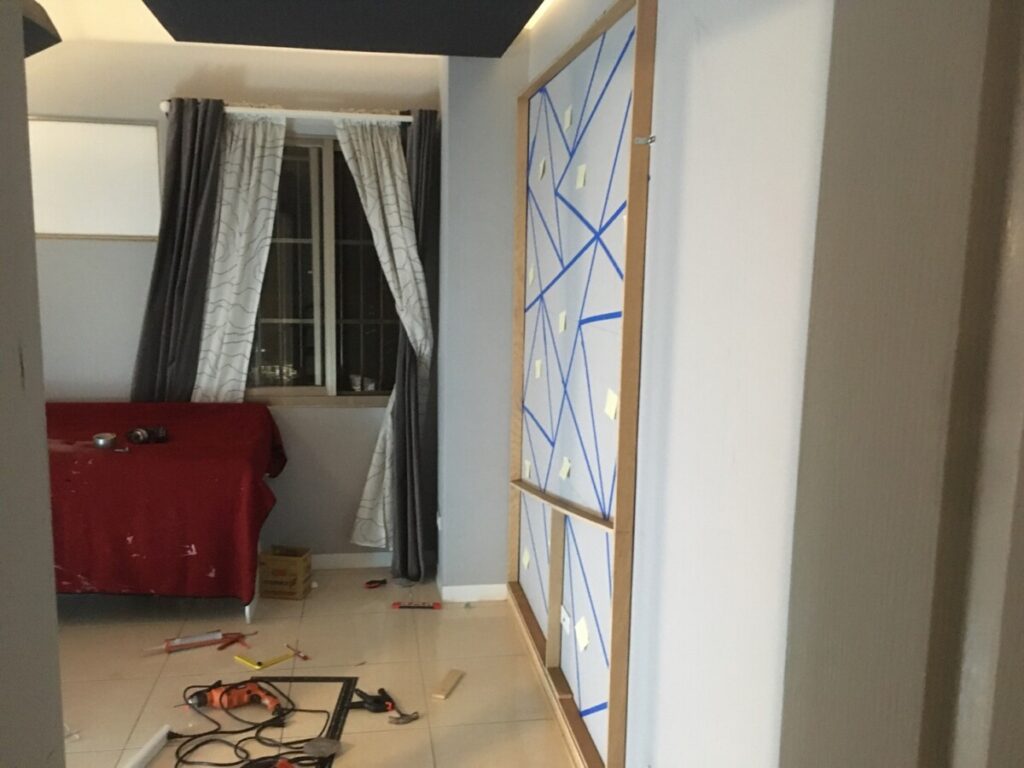
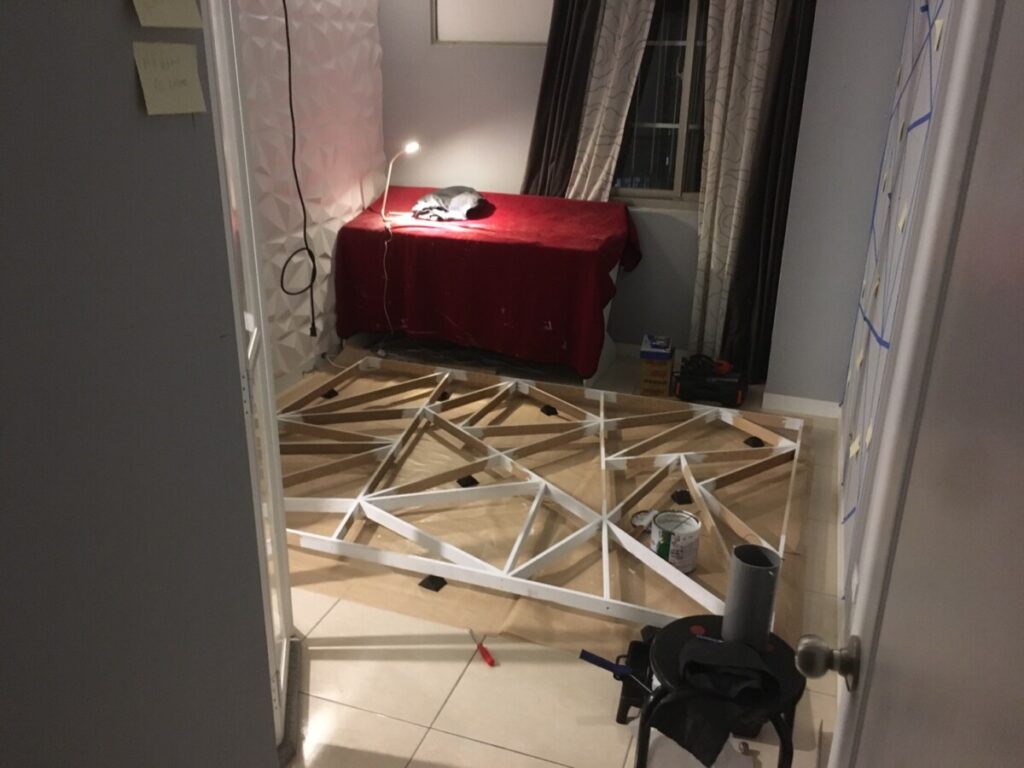
I decided that the best place to start would be to build a square frame first that matched perfectly with the square painters tape boundary on the wall. So I did that.
Then I looked at my painters tape triangle design and made some decisions about how to span the square and reinforce it. In my tape design there where two major arteries that ran the width of the square. So I cut them. I did have to cut the ends at angles of course. To get the correct measurement I just sat the compass on the wall and measured the angle at the tape intersections.
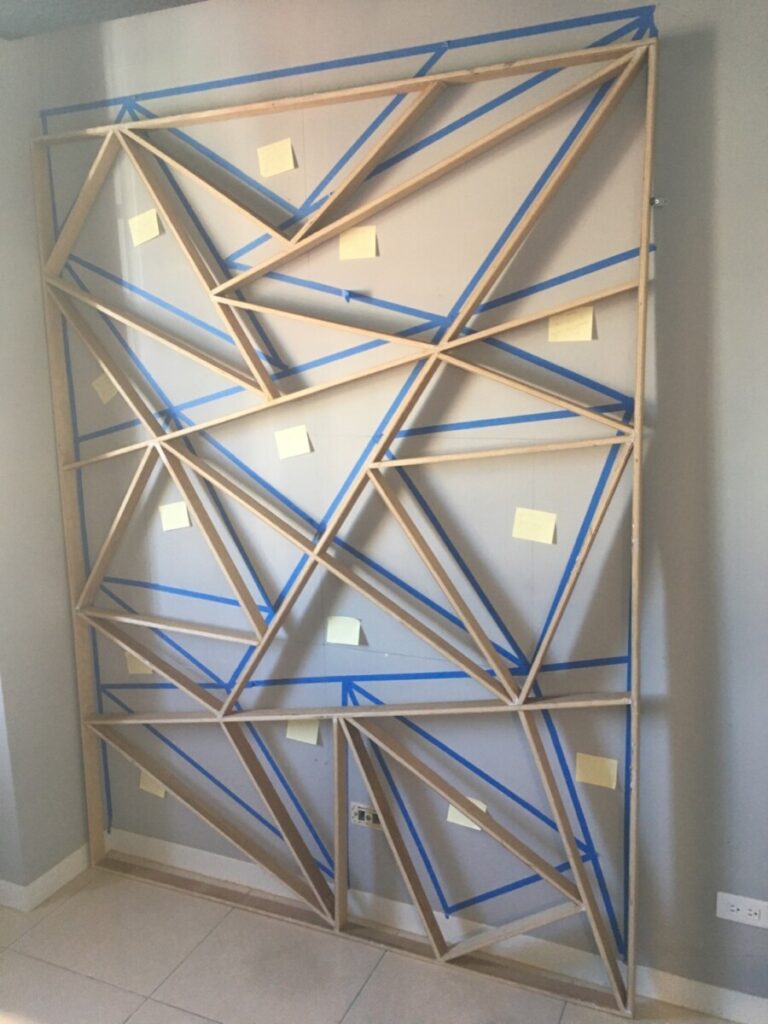
Once those first two internal pieces were cut and put into place I could proceed. I started by making all of the cuts for all of the triangles for the installment. Then, I worked my way through them in a logical way based on how they were going to be affixed. I used a pocket hole jig to pre drill the tops and tails in order to better fasten them as well as to better conceal where they were fastened. Once the basic skeleton was in place I placed the monstrosity up against the wall for inspection. Satisfied with how everything was going, it was time to begin building the interior frames for the triangles that were going to be the acoustic panels with fiberglass.
Acoustic Panels
The painters tape design was still on the wall and it was still my map. I used post it notes to designate which triangles that I would build panels for. With that arranged I got to the task of measuring, cutting, fastening, and assembling. I rested the monstrosity on the floor and completed the task of building each panel.
These panels were not as simple as a square box but they weren’t that complicated either. After accounting for errors along the way and making adjustments I was finally done and I was able to begin sanding the main frame. Before doing that I labeled each internal frame numerically, I wrote that number on the post it note on the wall it corresponded with. This way I would have a map for later when I would have to go about reassembling everything.
I decided to treat myself to a new tool to help with the job. So I picked up an electric sander and piles of sand paper. I cut all of the sandpaper to fit the sander and I was ready to make a mess. I sealed off the room and got down to the task at hand. It took a while but eventually I had gotten the frame sanded well. Happy with the work it was time to clean up the mess and find my paint brushes.
Painting
Before going on to painting I used wood putty to fill every void, recess and seem. That includes all the joints. I took my time with this process. I wanted to give the structure a professional appearance so I was meticulous. After the putty had dried I sanded again. When that was finished I went through once more with the putty doing touch ups.
After I had finished with all of that and the frame was sanded and readied. It was time to paint. I had the paint supplies in stock so it didn’t take long before I had the first coat of primer on. The next day I lightly sanded it all down and wiped the frame clean. I went on to apply two coats of paint to the frame. I went over it head to toe and touched up any and all imperfections. Once it was all finished I let it rest so that the paint could have proper time to dry.
Wrapping The Customized Fiberglass Acoustic Panels
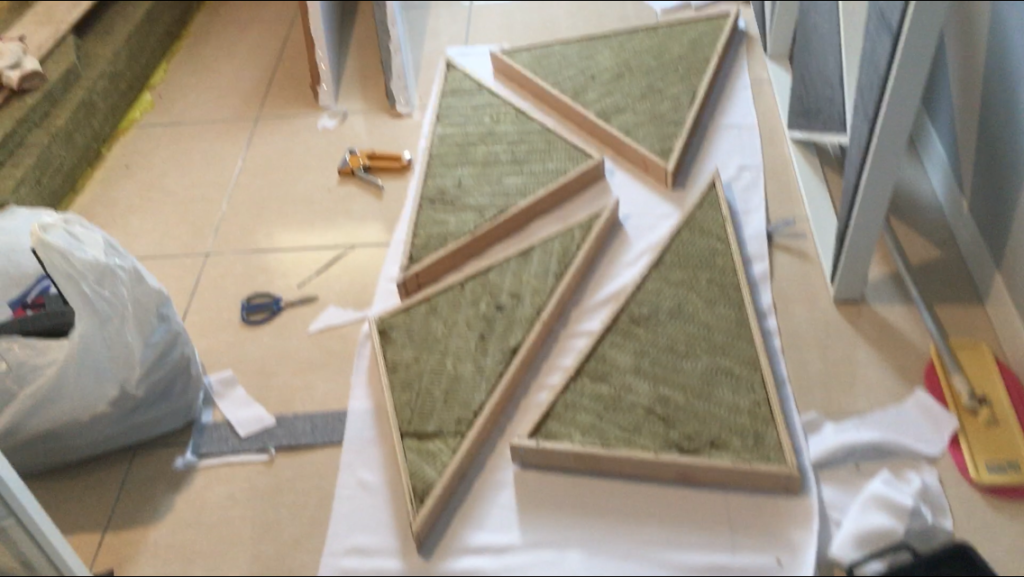
The next phase of the process had to do with stuffing and upholstering the interior frames. With the large painted structure out of the way I opened up the bag of rigid fiberglass to sort out what I was dealing with. Everything was in order.
I had to source fabric. What I found was slightly stretchable. I decided that I was going to use that for the backside of the panels. I also found a wonderful blanket material that I would use to wrap the exposed side. Once that was organized I picked up a new pair of sharp scissors. With everything together, I lined up the interior triangle panels in their numeric order and began making my way through the work.
Starting with number one, I rested the triangle onto a two by four piece of rigid fiberglass and from inside of the triangular frame I marked the fiberglass. After it was marked I reached for my straight edge and against a hard surface I scored and cut the fiberglass through. I was sure to cut it to fit snuggly within the frame. Then I placed the panel onto the fabric material intended for the backside. I traced it out with a sharpie and cut it. After it was cut I stretched it across the frame and stapled it in place.
From here I placed the triangular frame unto the blanket material to cover the front and traced it with the sharpie. After that was cut and I confirmed it would amply cover I filled the panel with the fiberglass. Then I covered it over with the blanket fabric, which I stretched snug and stapled in place.

The Moment Of Truth
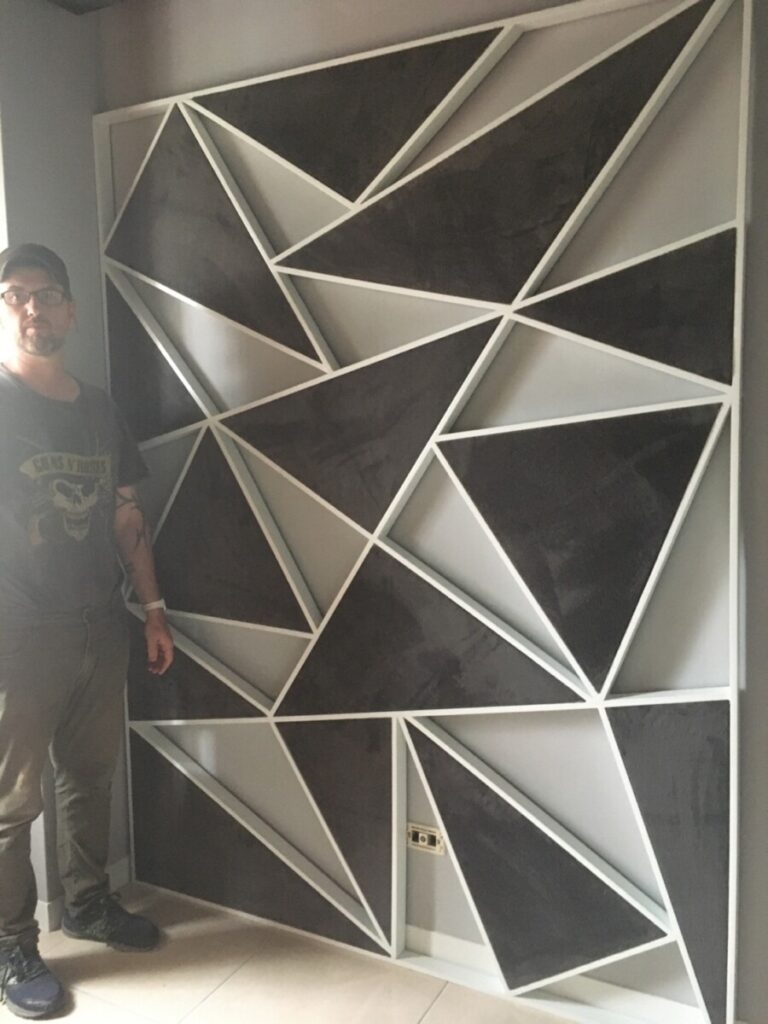
It was finally time to install the small customized triangular fiberglass acoustic panels into the large structure. I installed the triangle from the back of the structure. I lightly tapped it into position with a hammer. It fit tight and looked very nice. I couldn’t have been more pleased.
It took me a few hours of effort to work my way through all of those triangular panels. But one by one my speed and efficiency for the job increased. In order to evaluate my work and make adjustments I installed each completed panel immediately after it was stapled. Only after I was sure that it fit correctly did I continue on to the next panel. Eventually I had worked my way through the lot and was installing the very last panel into the structure.
A Fraction Of The Cost
When I was initially considering what to do to fill that space in the studio, I had spent time looking at a number of ready-made alternatives available online. The pricing for those choices was exorbitant. Building this Customized Fiberglass Acoustic Panels only cost me the price of one piece of plywood, one package of fiberglass panels and the fabric. And comparable to the other options that figure was practically nothing.
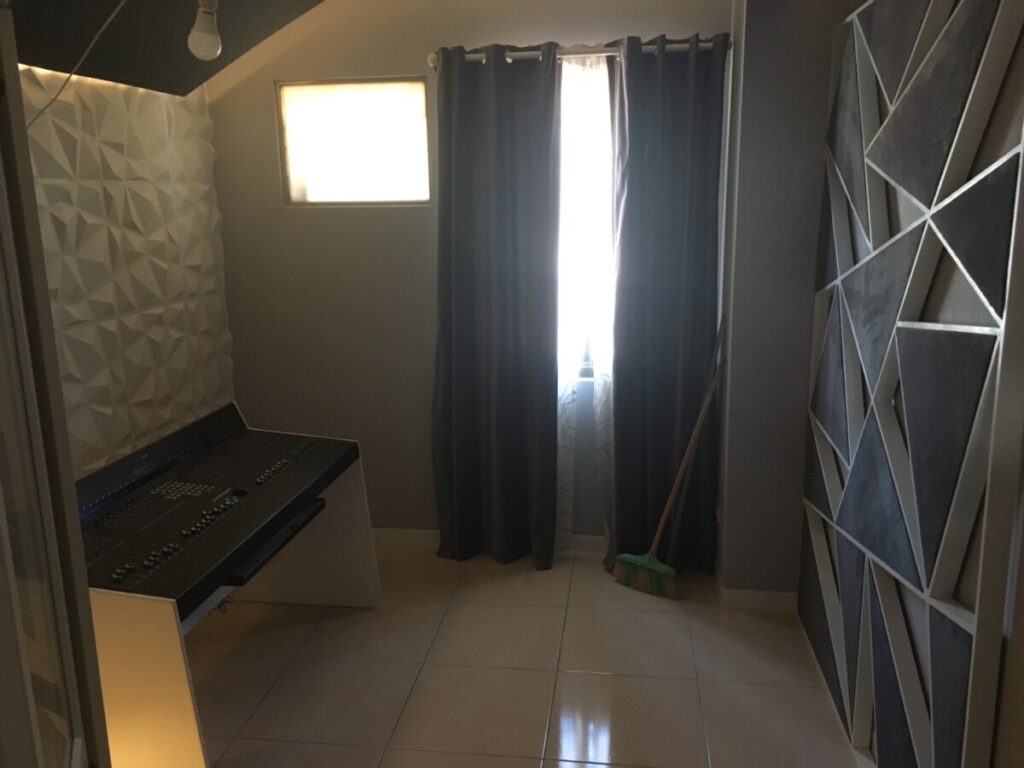
In addition to being inexpensive, it is visually striking and has become a feature of the room. Rather then having settled on something mundane, now I have customized fiberglass pcoustic Panels which are far more interesting. They add both character and charm to my project studio. In addition to adding a little bit of class to the room it also meets its functional purpose of reducing reflections.
While the entire project did take a number of days to complete there were no particular difficulties in seeing it to fruition. Before affixing the wall feature to the wall. I removed all of the painters tape from the wall and did some touch up painting.
I’ve considered adding some sort of LED lighting to the backside of the panel but because I am already using LED lighting in other areas of the studio I haven’t settled on the Idea.
In Conclusion
I wanted to write this article to share my experience with building customized fiberglass acoustic panels. You can certainly use a two by four square panel and mount them inside your studio and there would be nothing wrong with doing so. But if you want to add some fire to your workspace I’d like to encourage you to give your ideas a chance to percolate. You may just have one or two that could bring some added value to your project studio.
The most important thing is doing things right. So go the extra mile and make a good impression. And, if the good impression is only for your own behalf, that’s perfectly ok. Be creative, think out of the box, get inspired and create yourself an environment that inspires you. And we’ll hope that some of that will feed into your songcraft.
If you decide to try something like this for yourself, Here is a link to Rockwool for insulation in North America. This isn’t a paid endorsement, It’s friendly helpfulness.
Now go and get to it!
Good luck.