

So you are looking to take things up a level and get that well needed and well-deserved Isolation that you have been looking for. Me too. So let’s jump into this together.
My reason for building one is that I live in a tall apartment building and I have neighbors on all sides. To be honest I’m not necessarily interested in creating a room to get a certain sound for the mic. As great as it would be if my efforts would yield an outcome that was aurally pleasing my primarily interest has been to reduce the noise I create making music from seeping into the adjacent apartments above, below and on either side.
Typically I am a very loud singer and quite generally I love to be loud and nonsensical and I do find living in an apartment building to be very inhibitive in that regard. I am also relatively responsible mostly because I don’t want booted out of my home. So I’m accommodating.
The problem is when I am writing or trying a new Idea, The effort to be accommodating keeps me from freely exploring parts in my “outside voice of power.” Instead I use a nasally head voice usually singing in falsetto as a stand in to represent the power.
I squint my face up and demonstrate the song Idea to my wife using all the expressive power that scrunched up facial features can conjure to convey to her the impact of what that lyrical phrasing should be if only I could sing it out loud like a real human.
Oh for the love of goodness, years upon years in this tower of conformity.
SO my motivations may be a bit different and where I make edits and modifications in my own build may differ from where you may need or want to make edits modifications or divergences in your own.
I think the most important thing is doing what you want and getting what you want out of it
SO IT’S TIME TO DO SOMETHING ABOUT IT.
Building A VOCAL BOOTH IS like anything else it’s a step-by-step thing and just like eating an elephant. You have to take the first bite. And so I have indeed taken that proverbial bite.
Form of Function
So my intention is to be able to factory conveyor belt out piles and piles of songs. After doing so I intend on using YouTube as a platform to connect the music with those whom find it appealing.
So visual presentation means a lot. I think of it like a first date, the more presentable you are the better. Sure everyone has their flaws and it is not necessarily about hiding them, but rather it’s about minimizing them.
So while my writing room will not be 100% scientifically perfect. It will be in the direction of better than not. What I can control is how it looks. So with having the channel I want the environment to be useful for both functions. If I was writing without any intent to distribute I wouldn’t be so stubborn about how the environment looks. But I am for both.
In your situation you may be looking to do the same in terms of using some social media network to distribute your work or if you’re more of the engineer type maybe having a sharp looking place to record would really reassure your potential clientele. Keep in mind a lot of artists are never going to achieve the adulation and success that comes from working full-time as a songwriter. So just going in to record a few of their songs will be the climax to some of their dreams. So there is something nice about having a nice looking facility, whether it is a high budget stand alone facility or a humble home studio; give your customer a great recording and do what you can to make it a memorable experience for them by providing the best working environment you.
Additionally more then just presentation to others, having a workspace that is aesthetically pleasing goes a long way for your own mental positioning. As the saying goes, “seeing is believing”. Use whatever you can to leverage yourself.
I designed the space to optimize both the aesthetics of the space and the spaces utility. I used blue painters tape to outline the footprint of the vocal both on the floor. To give it more visual interest and less parallel walls I buttressed the design into the corner and planned to use one quarter of dodecagon which is a twelve sided polygon, to replace the 90 degree exposed corner of my vocal booth and to act as the entry way. I purchased 4 glass doors to be use as entry doors.
Finding Lumber, Making Compromises and Framing

Now I’ve spent almost a decade living abroad. While it has been a wonderful experience, at times my American sensibilities for ease of consumption are challenged and that has mostly to do with language barriers. This project has not been an exception.
Sourcing all the things I needed for this project was neither going to be easy nor convenient? There is a big box chain here on my Island unfortunately I found pinewood 2x4s for framing there at about $20 a piece.
I did notice another type of lumber available, but I am not wood literate to know the type. I did immediately think that it would make do. Rather then trying to make an order at the box chain, I found a local shop in the town I live. I walked into the shop and showed a photograph of the type of lumber I was looking for. The shop boss confirmed that they had the lumber so I put in my order.
At no additional cost they loaded up their truck and immediately delivered it over to my home. And just like that the first step was complete.
The lumber was sourced but the real work had just begun. Each board was two long to fit into the elevator so I was forced to lug them up the steps two at a time. Its cool though, I’m only on the fifth floor and I love to mule up stairs with lumber.
I used the map that I had taped out on the floor and began framing things out. I had decided that I would build three two sides and a lofted flat roof and lightly anchor to the wall. Then inside build two walls to float against the existing concrete walls and a dropped ceiling floated on felted channels. I would eventually use sound dampening curtains behind the glass panel doors that I’d purchased for the entry. Someday I may replace the glass doors with something better insulated, but I’ll have to wait for the time when I have the patience to source them out.
Plywood Sheeting
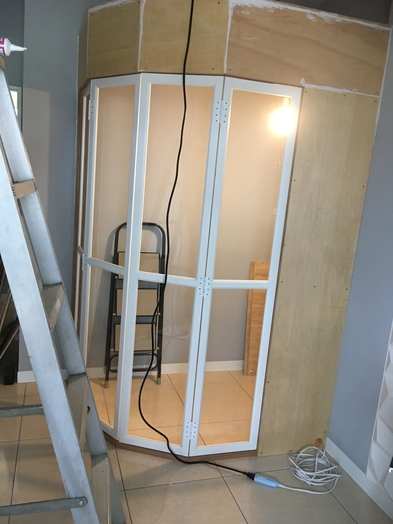
The Framing went in without a hitch. Once it was up and in place I was able to purchase 15mm thick plywood sheeting to clad it’s exterior wall. Getting and retrieving this lumber on my moped was a circus, but I for one have always enjoyed the circus. One of the pieces was just too big to carry on the motorbike. It was the piece for the roof. So rather than trouble someone to help me and because the shop doesn’t have any delivery that I am aware of, I decided to hoof it the 8 blocks home.
The upside is that for the price of one, I managed to enjoy two circuses out of the process of sourcing plywood sheeting. But then just like that, another step was done and I happily ticked the box.
With all of the plywood pieces home, I got to the business of cladding the frame, which was a joy. The great thing is the local hardware store where I’d sourced it from has a table saw and they do cutting for their customers there. So every piece I needed for my vocal booth was cut and when I got it home it was already in the exact dimensions necessary to install. That made for fast clean work.
Making Decisions About a Cable Pass Through
Before going any farther I had to make some decisions about ventilation and about some patch box or not for an xlr cable pass through. So starting with the latter I decided to do a poor mans opt out on that one. Not because I really wanted to do the poor mans opt out but because getting the patch box was going to prove to be a giant nuisance. I’m sure there is someone here on the Island in one of the cities that sell that product but none of my friends here are musicians and my bilingual abilities are not so extensive to include such trade specific items.
I already new I was going to be burdening others to help me navigate finding rigid fiberglass, and that was going to prove to be enough trouble to trouble my busy friends with.
So after looking at EBay, I decided I didn’t want to wait the 8 plus weeks to get the items from abroad. I especially didn’t want to make extra purchases during the constrictions on shippers at the height of the covid pandemic. So I decided to put some conduit through the wall that I would send the XLR, TRS and headphone extension cable through. After that I will roll felt around those three cables and feed that into the conduit pass through in the wall. It should be fine for what I’m doing.
Making Decisions About Ventilation
So I was really back and forth about ventilation because the doors are not sound proof. So I really teetered on whether this was necessary or not. But finally after long consideration I thought I would just go ahead and do it because with the heavy curtains drawn and the glass doors closed I still thought it would be best to have some way to quickly exhaust some of the carbon dioxide out of the space. I also thought that if the ventilation motors were silent enough I could run it all the time.
To be honest, if I was only ever going to work in the space myself Id probably not had taken this extra tedious step but I thought twice of it because I anticipate eventually working with other artists here on occasion and I thought it would be more comfortable for them and I’d endear myself as being more professional to them. So what’s done is done, and now that it is I couldn’t be happier because it took forever and it was not with out peril but I survived.
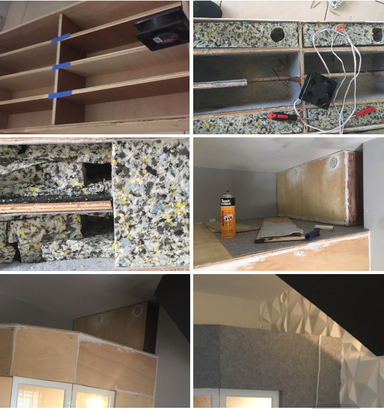
The first thing I had to decide after being certain that I was doing it was where I was going to build it and then how. The vocal booth sat in a recessed space so I finally decided to build the ventilation box above the vocal booth in that recess. So once that was decided I scoured YouTube looking for knowledge. I found this guy who had built something more respectable then I was intending to build, so I took what I could from that and from other pictures I’d found on Pinterest to form the concept of how the box should work.
For now I just needed to know where the ventilation box would sit so that I could know where to punch through the plywood cladding.
I measured all the pieces I needed to build the ventilation box. After that I made my way back to the hardware store to pick up my order of plywood for the box.
From there I needed to find foaming and I set out on a search to source foaming to insulate the air passages on the inside of the box. I found a local upholstery shop that re-does car seats. I have no idea how to discuss foam varieties in this language but I did my best and managed to sort out my order. A few days later my order was in to pick up and the foam was the perfect solution.
Back at home I took the measured piece of plywood from the ventilation box that was intended to sit directly on the vocal booth. I cut two wholes through that for intake and exhaust measured to allow a large diameter drainage PVC pipe to pass through.
I used the pipe to trace the holes and with a jigsaw I cut them out. I used that piece of plywood to rest snugly into the recess directly where it would eventually sit when the ventilation box was built. It allowed me the ability to trace out the circles to cut through the roof of the vocal booth, which I proceeded to.
After that I grabbed the plywood ceiling cladding for the interior and rested it on top of the exterior top of the vocal booth so I could trace the wholes from the just cut ceiling plywood. I tested the piece afterword from inside the vocal booth to know that it would fit properly and once I was certain It did I set it aside because I still had to settle on a solution to insulate the walls.
Insulation
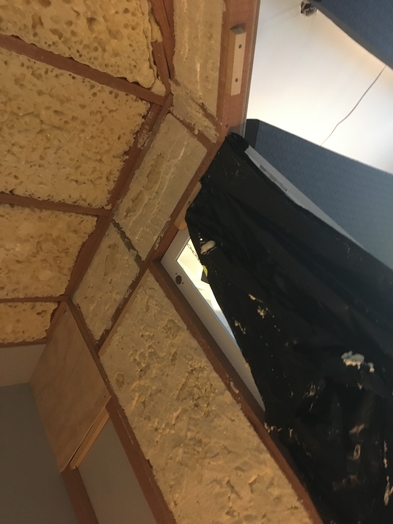
I finally decided to insulate the exterior wall that I’d built to corner in the vocal booth and exterior ceiling with spray foam. That was the start of a very interesting few days that I like to call the spray foam week of hell. I had so many trips to the hardware store to restock on that stuff and it was a mess. No, that’s not true, it was a GIANT mess.
While I am not a professional carpenter, I have logged enough hours of doing things with my construction hat on that I’m fairly reliable, but some how It missed my attention that you are suppose to spray that foam into the wall with the can upside down. After a couple of cans into the nightmare I was dumbfounded why anyone would ever use this product for anything.
Later that day I was back at the hardware store to buy more. I told my friend in the shop about my troubles with the product. She informed me that I needed to hold the can upside down. I was delighted. If you knew that already you are smarter then I was that day, but like the saying goes, “How would you know if nobody told you?”.
I raced home armed with more foam, opened the studio door and crawled in over the ever expanding foam that had oozed down out of the wall cavities and began to try out the new technique id just been informed of. While it did work better, it was still horrendous to have to apply.
In the end, I had went through so much foam it became more costly then I’d anticipated. But, acoustically it really did turn out great. The foam in the walls and ceiling is dense and you could hear the difference immediately. After everything was hardened I shaved the excess protrusions with a hand saw and got ready to sheet the interior.
Sheeting the Interior

After cleaning up the spray foam mess, I set my self to the task of sheeting the interior walls. I started measuring for the pieces that I would need. I listed everything down, double checked the list and then made another visit to the hardware store to buy the plywood I needed.
After that was finished I made my last journey home with too much wood strapped to the floorboard of my motorbike. Thankfully there were no cuts big enough to warrant me walking them home so it was smooth sailing.
When I got everything back to my house I went about the process of enclosing in the interior walls of the vocal booth. I used some industrial glue on all of the framing to make sure that it was airtight and after that I screwed each piece into place one at a time until it was finished.
Polyester Felt
The next step was to acquire a roll of polyester felt. My plan was to completely skin everything with the polyester, interior, exterior and even the floor. So I took all of the measurements and made my way to the city where I found a fabric shop that had a wide selection in gray-scale felt and I made my choice. I tied the roll down to the motorbike and made my way back out of the city over the mountain and to my town in the countryside.
I had already stocked up on spray adhesive and industrial glue and I was ready to go I started with the roof of the vocal booth and worked my way down the outside and in. Eventually It was wrapped. I do have to admit all of that felt gave me flashbacks of building speaker box enclosures for subwoofers during high school. For your information there were areas that opted in addition to the spray adhesive and the industrial glue to use a staple gun. I tried to keep this to a minimum but it seemed to be necessary in certain circumstances such as the portions where the felt was folded over a corner. All and all everything turned out brilliantly and I was infinitely pleased.
Floating Wall and Ceiling Traps

Before I could get into building the interior walls and floating ceiling I had to order the rigid-fiberglass. I enlisted the help of a friend to help me translate rigid-fiberglass into the local language. After that and in short order she had tracked down a local company here that manufactured it. Sight on seen I said “GO” and handed over my credit card.
When It arrived I was thrilled because it was exactly what I needed and knowing that I would not have to jump through any more hoops in regards to this particular task, I was free to design, build and install the interior walls.
I’ve mentioned this before in other posts but I had a teacher at university and he would always say “keep it simple”. So applying that philosophy I decided that as this is not a commercial studio and as I was not contracted to build this for someone else, floating the walls on a few layers of felt would be satisfactory for me.
So I built three panels for the interior walls. I was not going to build panels for the entire way around the vocal booth, but only against walls I shared with neighbors and the ceiling. I created two panels that would be placed in an in-line succession on the left going in and the third would be at a ninety-degree angle on the far interior wall. I would shorten them from reaching the ceiling so I could use them as a ledge to float three panels on for an interior ceiling. Later every panel was wrapped with a heavy blanket like fabric so when I made all the measurements for the cuts I accounted for that.
I took time during this step to wire lights and an electric switch box. The switch box controls the ventilation fan, interior lights and an ambient light that lives on the top of the vocal booth.
I had the hardware store rip a 15mm plywood sheet at 5cm increments. Maybe that yielded 22 or 23 pieces. I carried them home again to the dumbfounded stares of onlookers. I used those pieces to assemble the framing for the panels and it worked great. The only challenge in any of it was accounting for the venting system in one of the panels.
So after hours of staring at the ceiling I had comprised a plan that I could be proud of. Then I had to get down to the hard work of seeing it out. I started by building the panel frames. When they were all assembled I did a test run. Once I new it was going to work. I fastened fabric to the backside of the panels. With that fabric in place I could install the insulation. I enclosed the panels with the heavy material and staples. I installed two wall panels to form a ninety-degree corner. Everything was snug and they held themselves in position. From there I had the first of the three ceiling panels to set in. As I mentioned before the wall panels were shortened to allow for the ceiling panels to rest upon them. I used an L bracket with padding to carry the ceiling panel on the opposite wall without the fiberglass panel. This first panel was the most challenging to install because it had to be integrated with the ventilation system. So after I had finished wrestling with that I installed the second ceiling panel with ease then the third wall panel and then the third ceiling panel rested on top of that and I screwed an L bracket up on the opposite wall to hold that panel in place. So with the exception of three L brackets the panels are standing on their own volition. They are not going anywhere, putting that together was like real life Tetris.
Finishing Touches
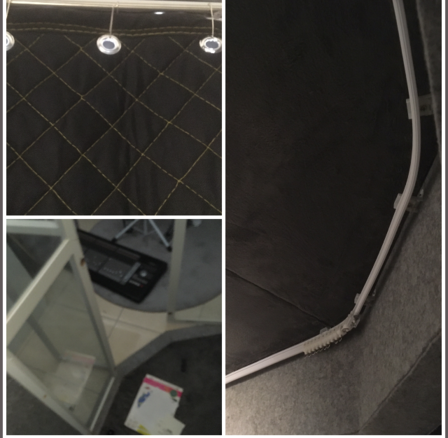
With all of that done I cut in a carpet remnant for the floor. I may go back later and add a layer of foaming or padding underneath it but for now I’m not convinced I need to. I also installed a flexible curtain rod on the interior. I bought heavy-duty acoustic blankets to hang. The next and last step was sealing and making adjustments to the doors.
In Conclusion
The vocal booth does a dramatic job of reducing and suppressing the high decibel levels and even before getting to do any serious recording in the room I have been using the vocal booth just to practice singing without having to feel self-conscious of disturbing my neighbors or wife. If you are interested in doing something like this and you have the space and the desire to do it I say go for it.
Now go and get to it!
Good luck